The house we moved into in Fall of 2020 is excellent in most every way. Except it has an oil boiler. Heating a large house. In New Hampshire.
After seeing the first January oil bill, I knew it was time for heat pumps. I had one at my previous house, which had relatively cheap natural gas heating. This was a whole other level of financial pain. Burning oil for heat does not have much of a future.
So, I planned all year for a multi-step installation. This is the story of the first step: heating the bedrooms and my wife's office with an air source heat pump.
Equipment
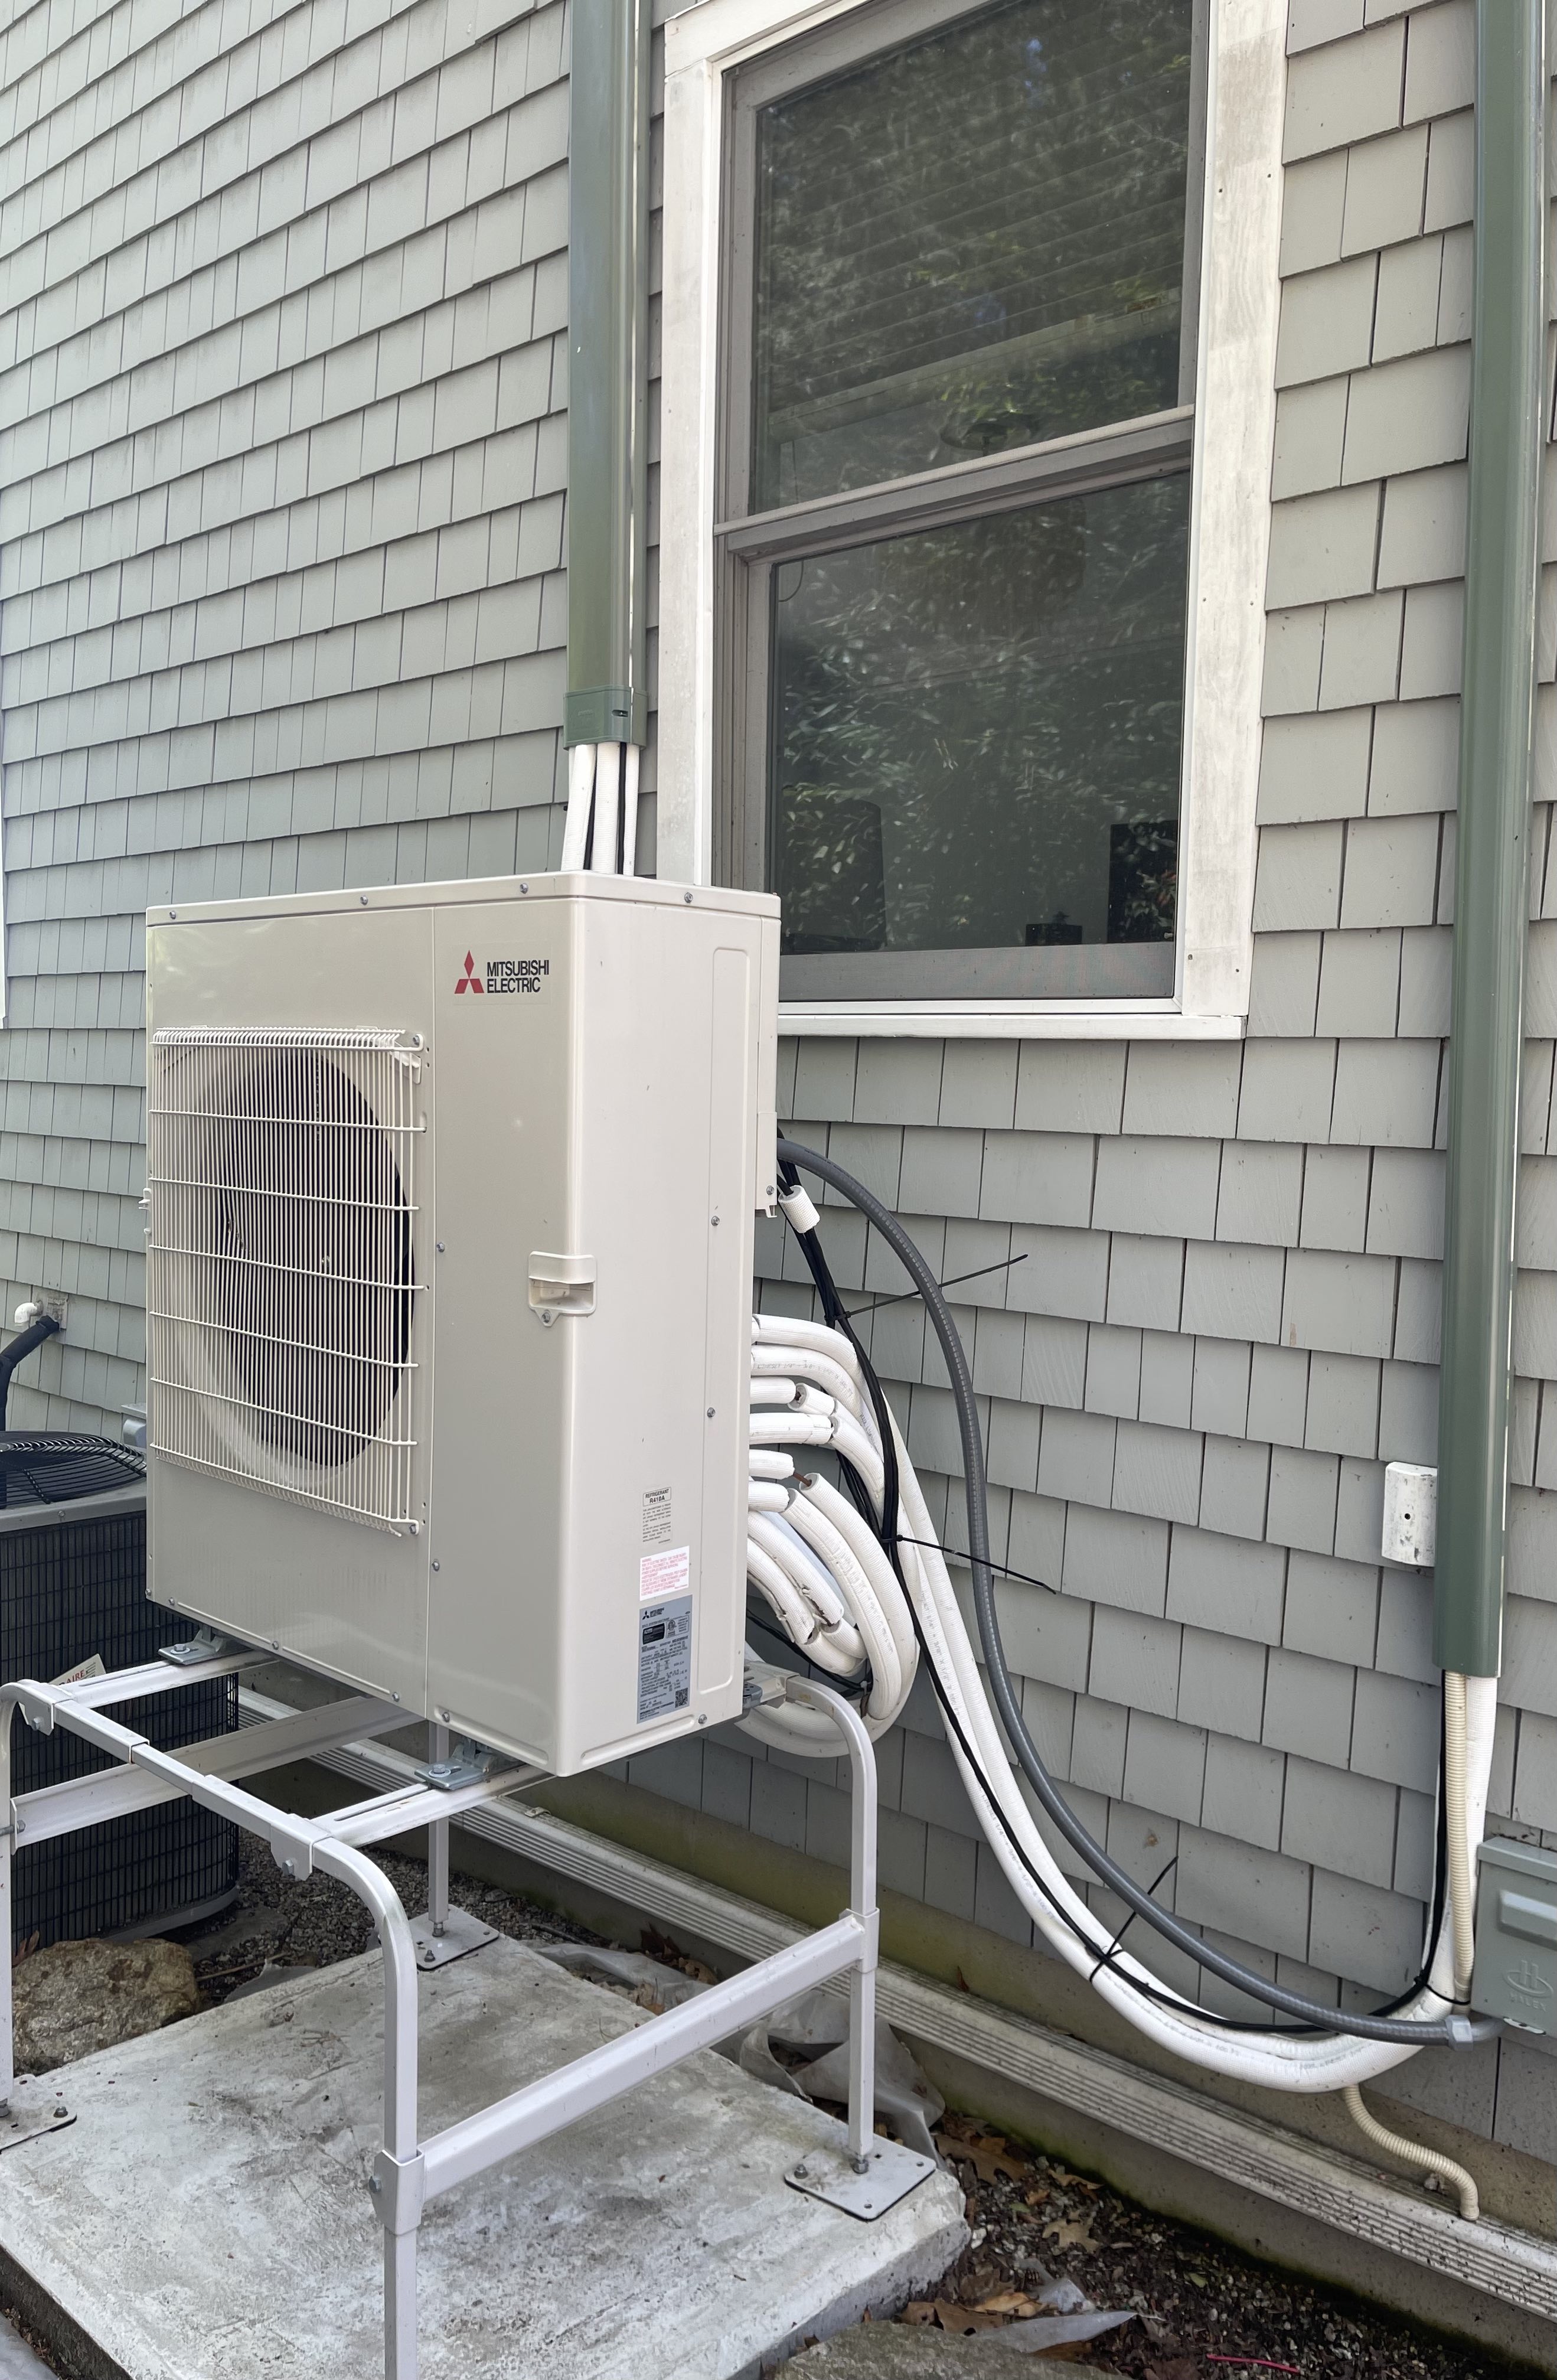
I went with Mitsubishi pretty much entirely because they make a ceiling cassette head unit that fits between unmodified standard joists, and I didn't see any other way to get the refrigerant lines to the children's bedrooms and the office. The one major downside is the smallest capacity Mitsubishi sells in this form is 9 kBTU, wherein my son's bedroom and my daughters bedroom and adjacent bathroom could probably get along with 6 kBTU. As the office is open ended and hot air would escape into the hallway and nearby rooms, I bought a 12 kBTU unit for the office. Finish that out with a standard wall mounted 12 kBTU unit to cover the master bedroom and bathroom.
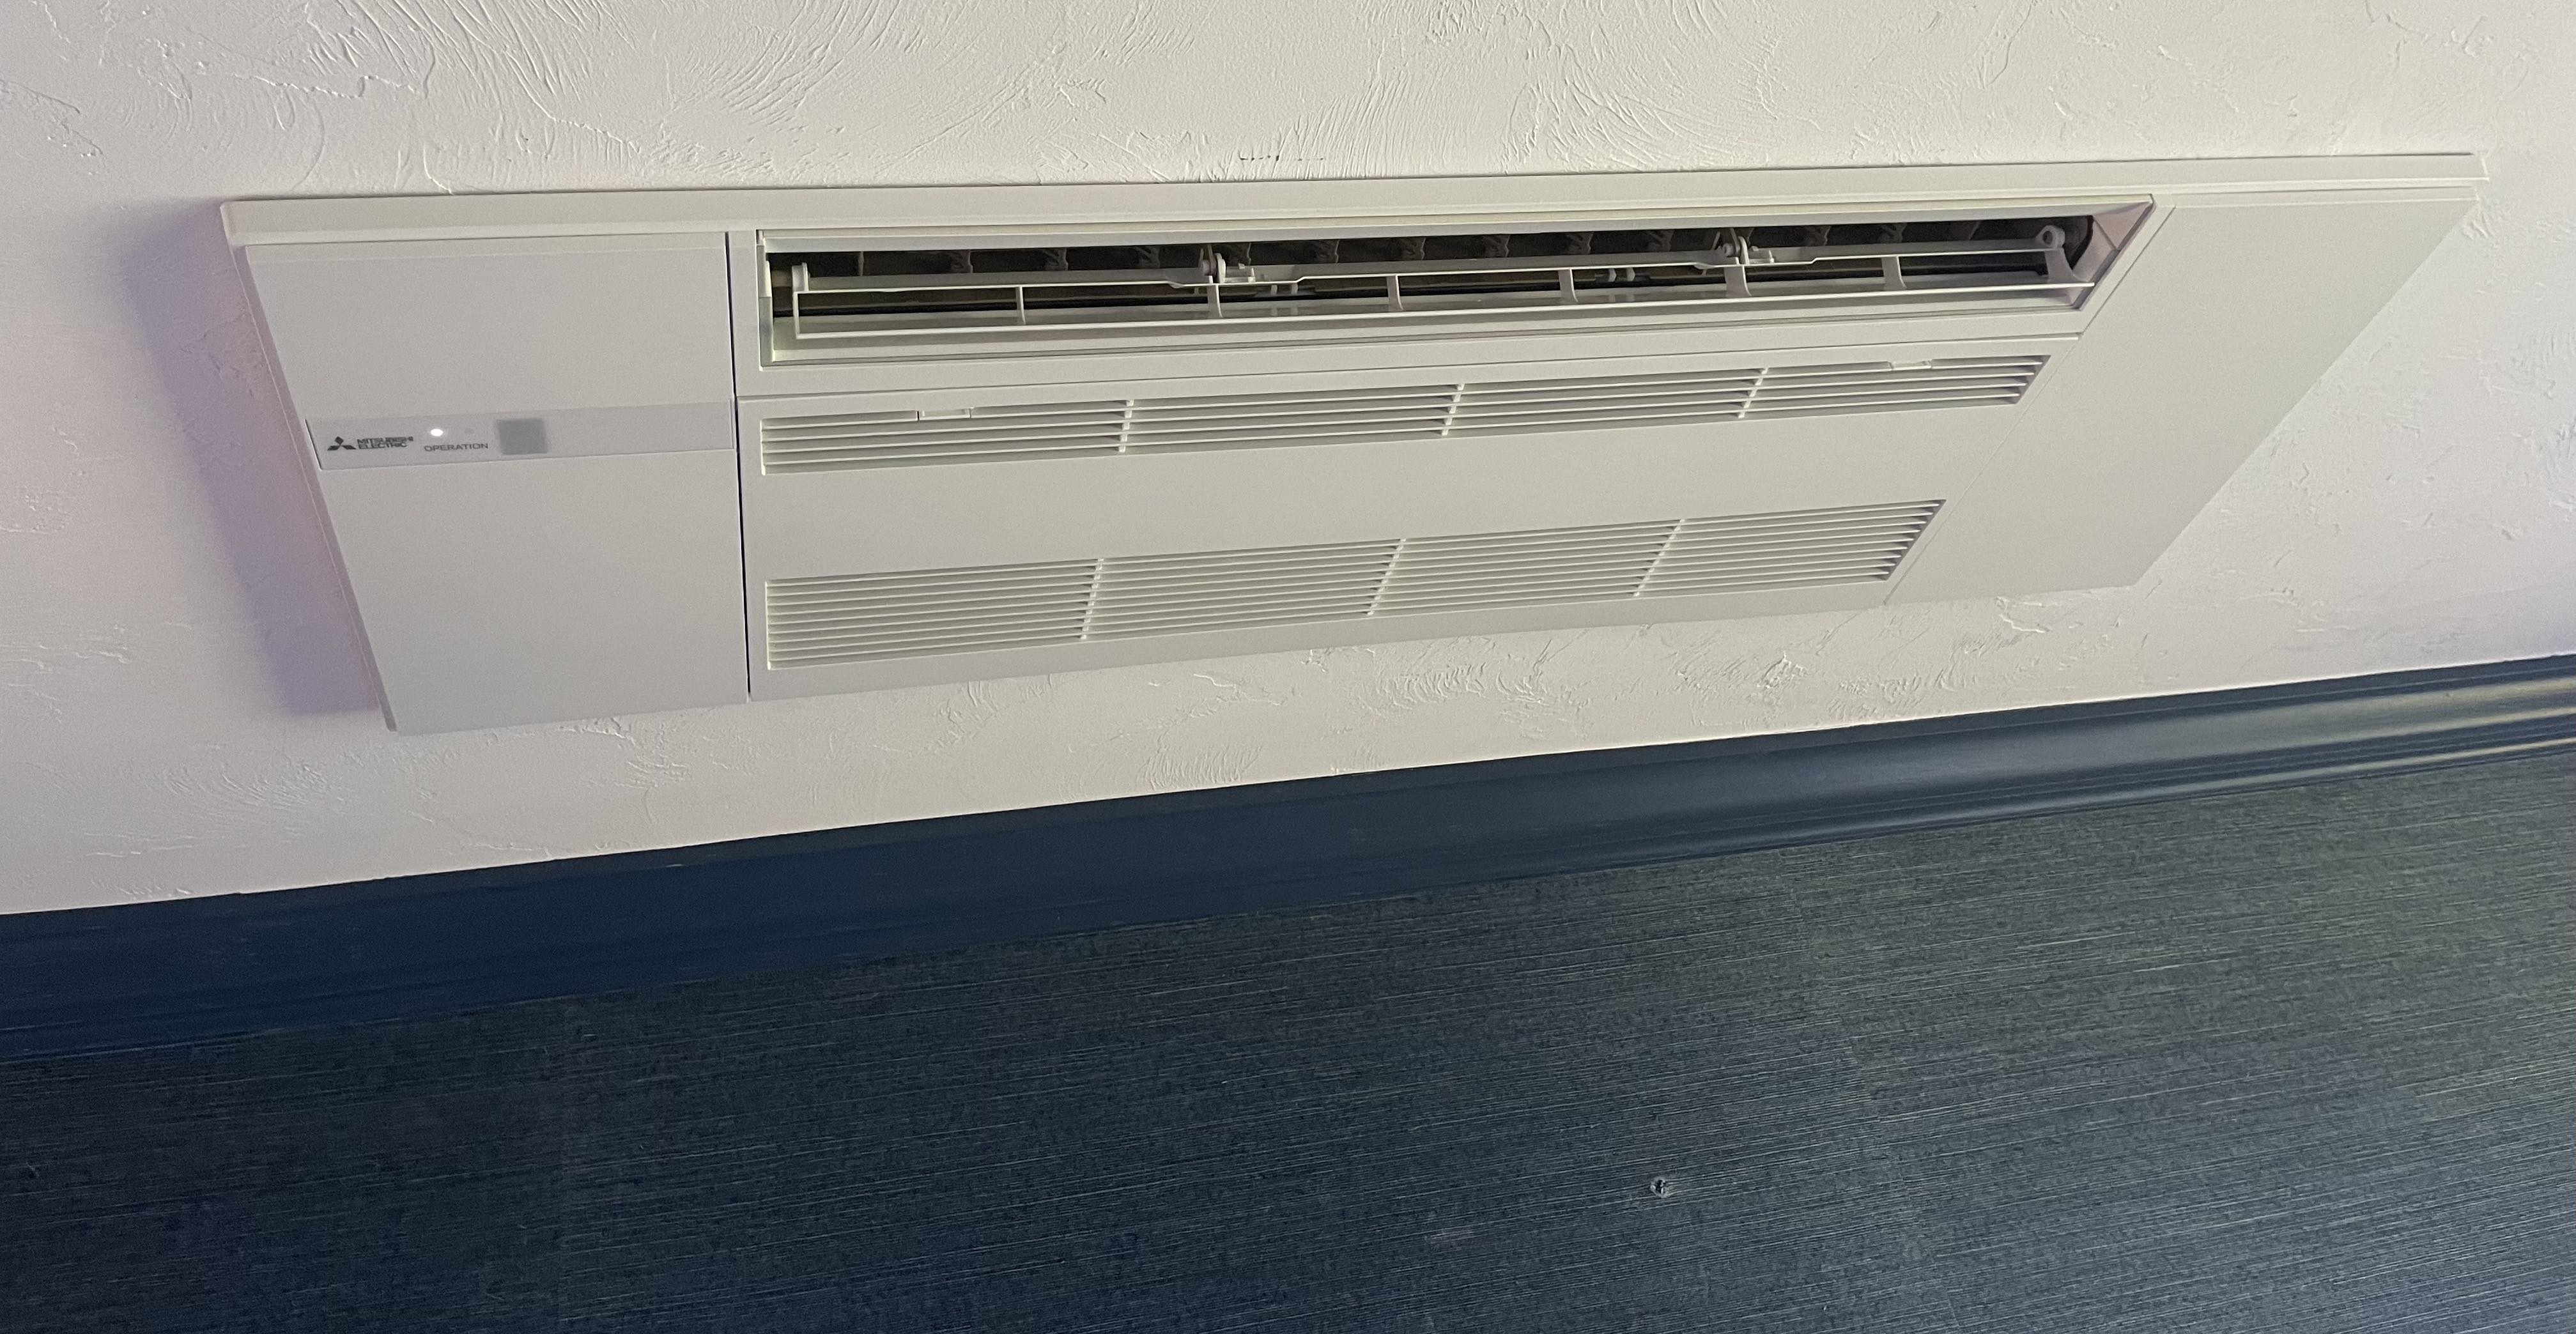 |
| MLZ-KP12NA Ceiling Unit |
I had hopes that if I installed the ceiling unit while my wife was out of the house, she wouldn't notice it right away, and I could argue it hadn't ruined the esthetics of her office, but she did notice it. Thankfully, she was OK with it and its premium look. Much nicer than the typical wall wart mini-split.
As we would be keeping oil as a backup, I didn't feel compelled to purchase the more expensive hyper heat heat pump. Adding up the head units, and I bought a matching 42 kBTU inverter style heat pump. Southern New Hampshire only dips for a few hours a year below 0°F, and as I was to find, even the non-hyper heat model generates useable heat at that temperature.
- 1 MXZ-5C42NA 42 kBTU 5 Zone Heat Pump $3596
- 2 MLZ-KP09NA 9 kBTU ceiling cassettes 2×$785
- 1 MLZ-KP12NA 12 kBTU ceiling cassette $1175
- 1 MSZ-GL12NA-U1 12 kBTU wall unit $654
- 200 feet of refrigerant lines around $1000
- Covers, threaded rod, screws, wire, a breaker, concrete, mounting stand maybe $800
- HVAC guy to connect the vacuum and hook up system $600
- Total about $9400 - 800 NH rebate = $8600
This is a premium unit and there are certainly other brands that can be had cheaper. If you travel in China, near every apartment is a mini-split of some kind which implies they can be made cheaply. I just like the hardware and the design of the Mitsubishi ceiling units.
By the way, the first compressor
GotDuctless.com shipped was damaged in transport and they sent me a second, but they haven't yet picked up the first. It's been sitting in my garage for over 6 months. The second was only scraped a bit in transport, so I shrugged and installed it.
 |
| MXZ-5C42NA Heat Pump |
In doing most of the install myself: running electrical, running line set, cutting openings in ceilings, pouring concrete, etc., I saved at least $5000 over having the pros do it. I was lucky enough that the son of a former co-worker was available for dealing with refrigerant, and he even installed most of the condensate drain work. We ended up draining the upstairs units via the drain pipe of a conveniently located bathtub. By the way, the ceiling units occasionally gurgle when used for cooling.
It's a lot of money, but when you consider I needed to replace the corroded and dripping manifold on my radiant heating system this year and the cheapest of 3 bids was $5000 just to occasionally heat the floors in the main living area, pretty reasonable.
Performance
To confound this analysis, I realized mid-Winter that my water was being heated with a kind of indirect system from the oil boiler which even in Summer months burnt 1.6 gallons of oil a day just keeping the boiler running and feeding the water heater. In mid-March, I replaced the hot water system with a Rheem hybrid (resistive+heat pump) unit for another $3400 installed. No rebate available this year.
$8600+3400 = $12,000 total expenditures
Good thing too, as the water tank was 11 years old and failing. About the same time, the oil boiler took to dripping water out of the relief valve and air vent and I had to shut it down pending repairs. Which points to another great advantage of having 2 heating systems, it makes a failure of one an inconvenience not an emergency. I shut off the boiler for over a month while taking my time to find the parts I needed and it was not a big deal. I won't need it again till January.
So how did the system perform? Pretty well, we burnt 711 fewer gallons of oil than the previous year, and taking into account the month to month variance of oil price (which was between $3.30 and $6.59! this heating season) we saved $3190 in oil. But we spent $1570 more in electricity feeding the heat pump and water heater. So, in net, we saved $1620 from mid-November till today (May 7th).
For the previous year we used a total of 1514 gallons of oil, which would (assuming the price of oil is about $5/gallon for the rest of this year) would have cost us ∼$6700 for this year. I'm not planning on using another drop of oil till the outside temperature drops below 20°, so I think the current system will allow us to use around 400 gallons of oil per year.
Projecting electricity usage. During late Spring, Summer, and early Fall, it will almost all be water heating cost at $1.60/day, maybe $300. Assuming September through November the heating costs are like March, April and May, that would be maybe $500, so the total heating electricity will be $800, let's make it $900 for the occasional chilly night.
$6700 oil (2021) - $1810 oil (2022) - $1570 elect. (actual) - $900 elect. (guess) = $2420 yearly savings
Thus I project a system payback at ($12,000 ÷ 2,420) 5.0 years just on heating costs. I assume the cost for cooling will also be greatly reduced: the central AC makes the entire above ground (2 floors) volume of the house a single zone whose compressor and air handler cost about $1/hr to run. In 2021, we used about a thousand extra kilowatt hours a month during June, July and August for cooling, so that's over $200 per summer month from which we can save money. We'll see.
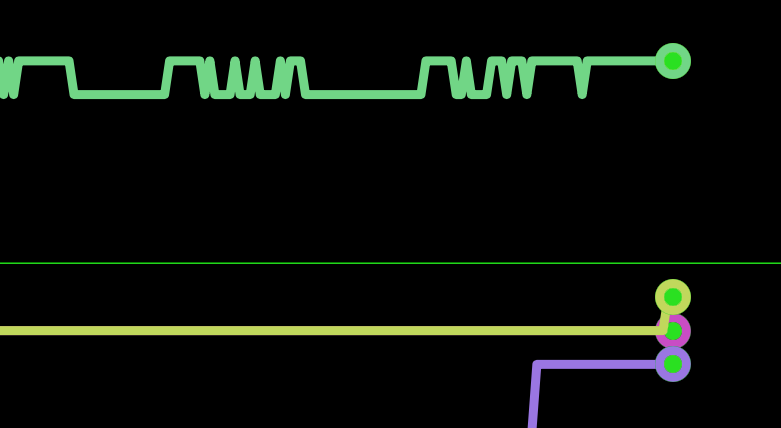
As the chart below of kWh per day versus temperature, the pump maxed out at around 85 kWh for a couple of back to back days where the lows were around 0°. At that point, to keep the rest of the house warm we were also burning a fair amount of oil. It was fairly loud running all out. The one major problem with my install was placing the compressor only a few feet from our bed. I may have to see about upgrading the windows, and trying to lower the compressor another foot. Most days it isn't an issue, but in mid-January, you notice it.
 |
Kilowatt Hours vs Daily Average Temperatures
(includes water heater) |
I installed a smart oil gauge in early January so you can see usage plummeting over time. The readings are too noisy for daily tracking, but you can see oil usage was high in January and kept going down. It maxed out at 7 gallons a day, which would be a wallet draining $46 for that one day (1/16/22) at the current price, and that was in addition to $16 of heat pump electricity. Oil heating demand for everything but water heating was shut off in early-March and I turned off the boiler entirely in late March after the water heater install. Basically, the heat pumps can handle everything comfortably above around 20°F, so no need to keep it fired up.
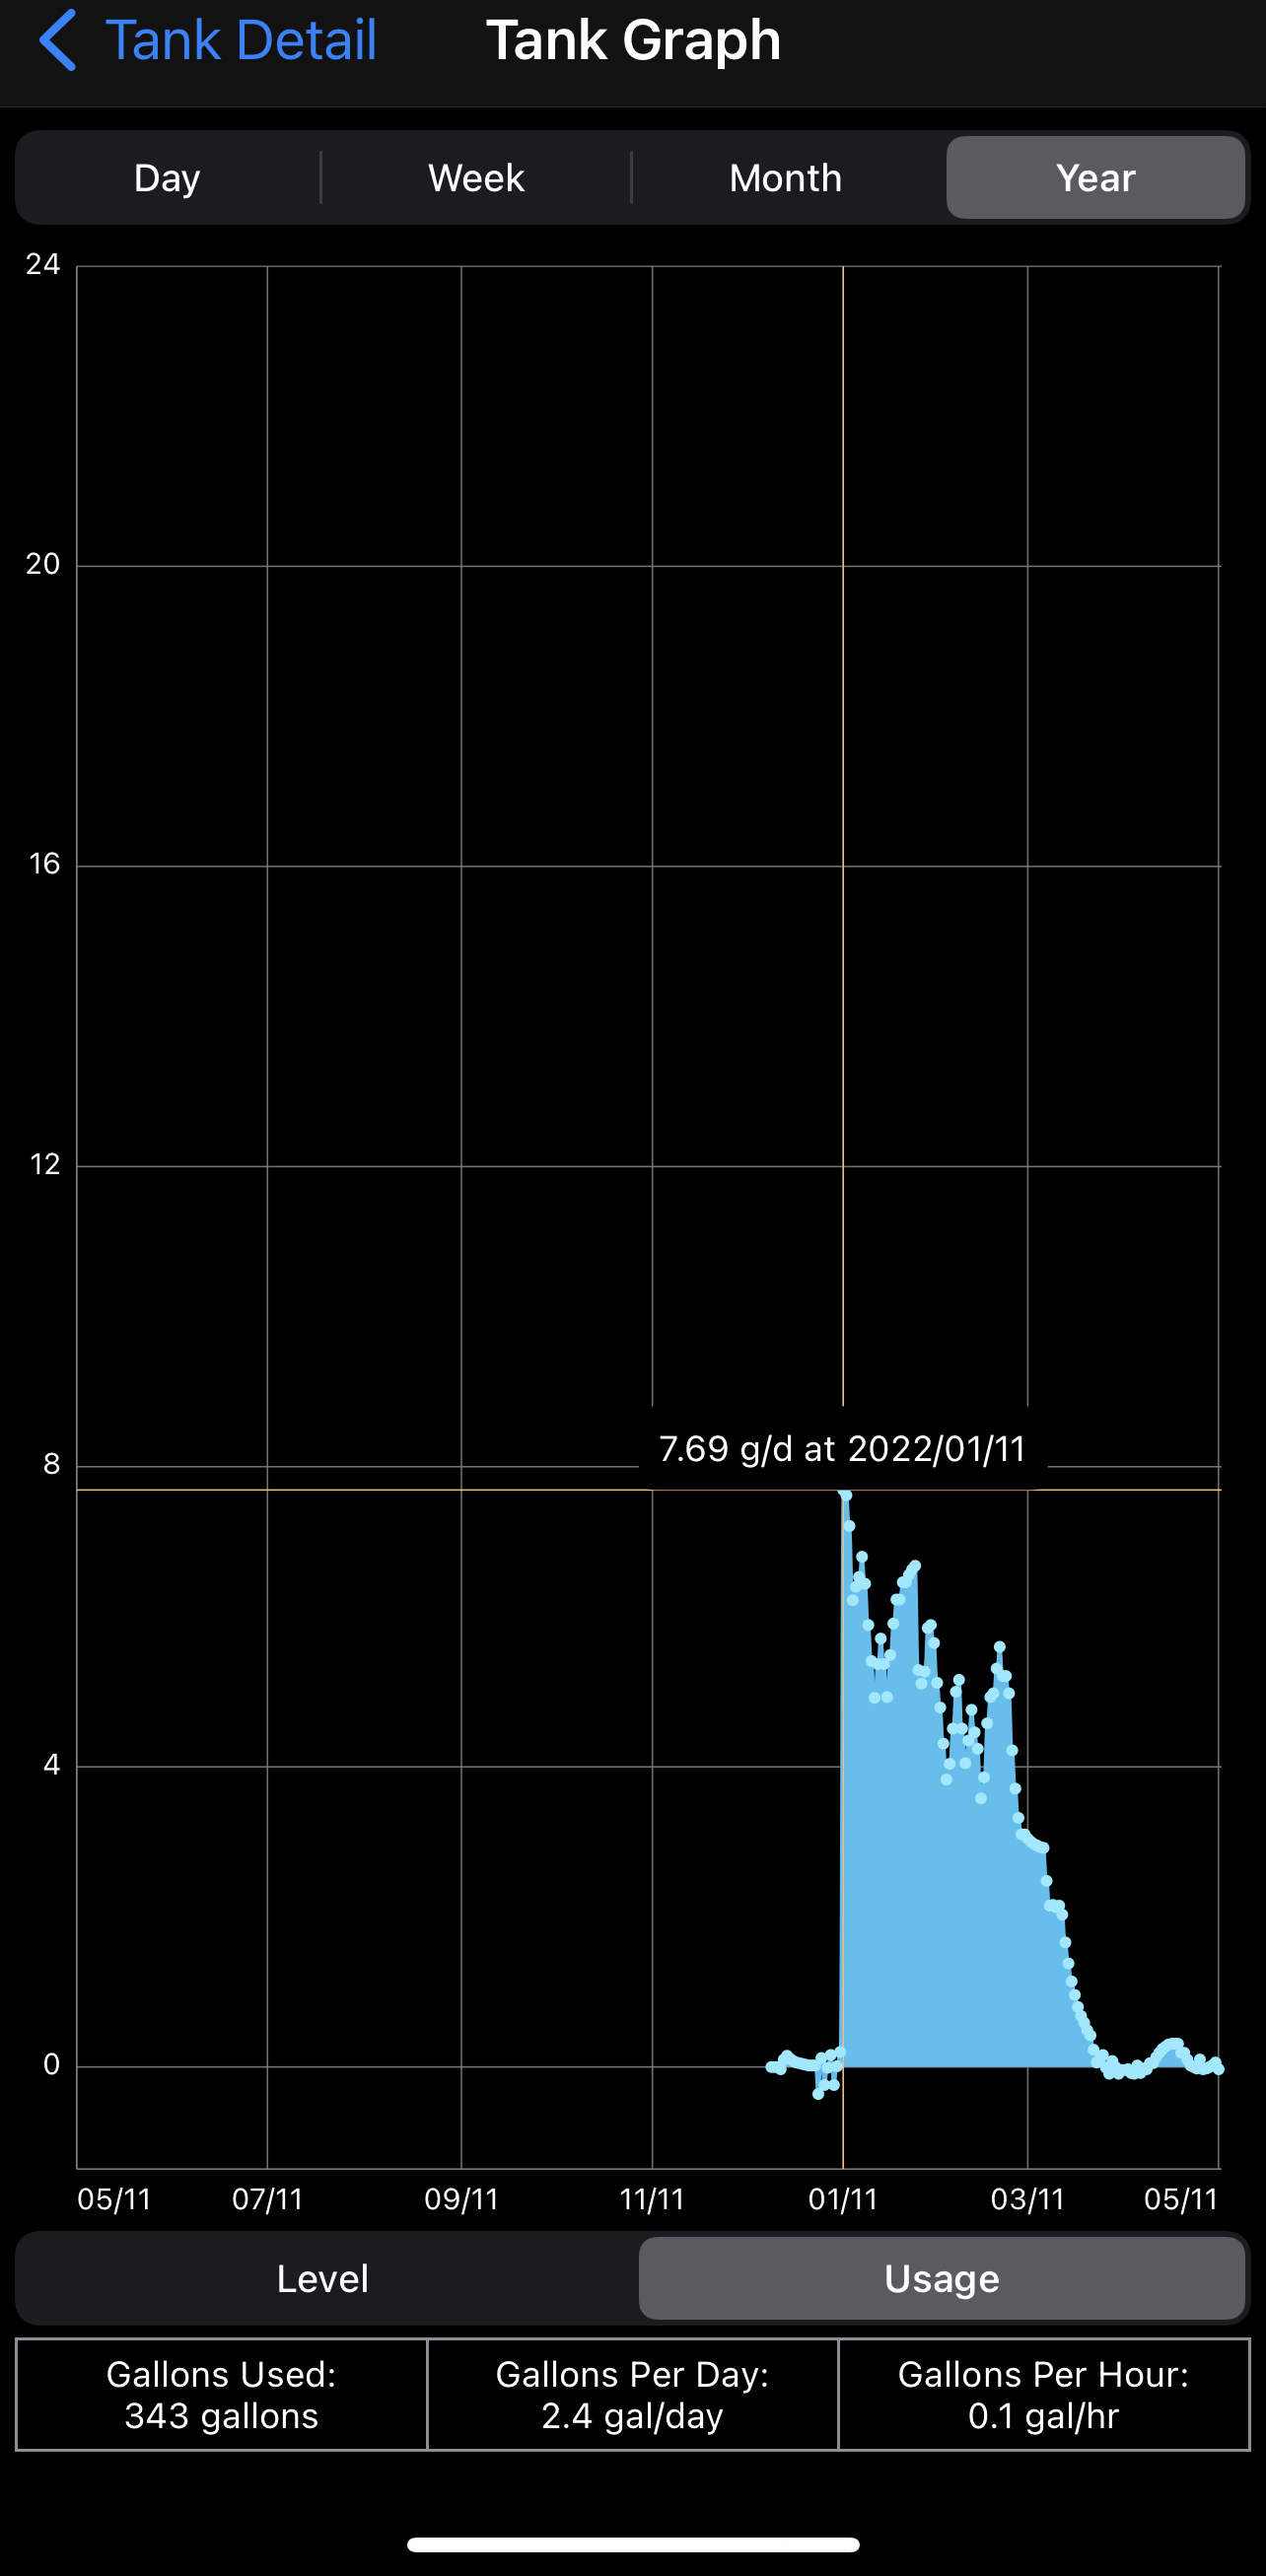 |
Smart Oil Gauge Readings Since Early January
|
I think the main takeaway here is that even at its worst efficiency, when it is maxed out and can barely keep up with heating the bedrooms, it isn't any worse than oil. There was never a point where I thought I should shut it down and just run the oil boiler by itself. At least when oil is 4 to 6 dollars a gallon, even here in the expensive Northeast with electricity at 21.4¢/kWh (it started the year at 18.6¢/kWh) When the outside air is over around 20°F, I can turn off the oil boiler and really start saving money. Not that it was fun paying $428 in January for the electricity to feed it.
 |
| Emporia Energy Monitor of Monthly Heat Pump Use |
One of the nice features of the system is that everyone in the house has some control over their own environment. My daughter likes the temp in the low 60° range, my son in the low 70° range. I like low to mid-70s. My wife likes to save money whatever the temperature.
Another is the lack of dirty ducts. With this system, every few months I wash the filters out, and maybe replace the allergen filter; no possibly moldy ductwork, and no potentially virus ridden air flowing from bedroom to bedroom.
The least favorite problem is that unlike a nice, low maintenance thermostat, these head units take some daily futzing to get the temperature you like, and sometimes there will be a dispute between the head units over whether to go into heating or cooling mode and the loser will be left to blink its status light until somebody comes around and turns it back on. Doesn't happen often with the units all in auto mode, but it does happen.
Mitsubishi should really improve their smart device offerings. The thermostats or thermostat integration hardware they offer are not DIY friendly. I did end up buying a little infrared smart controller (a Sensibo) so I could control the office unit from my iPhone although that confuses my wife as the Mitsubishi remote won't know I used another device to change the temperature. Maybe Elon Musk should get into the heat pump business, Mitsubishi is leaving a lot of room to be leap frogged.
Water Heating
As I said, I had an 80 gallon hybrid water heater installed in the basement, and there are a couple of issues. The previous, indirect system generated huge amounts of very hot water. In a year of use, I never ran low on hot water, even when filling the Jacuzzi in the master bathroom. With the new system and a teenage son, I must take care. The water heater has an app—doesn't everything these days—and I can make sure it's at capacity before getting wet. I ended up setting the water heater to its maximum 140°F despite the incessant scald warnings because otherwise the water was not comfortably hot by the time it wound its way upstairs to the kid's bathrooms. Also, this gives the added benefit of larger practical capacity.
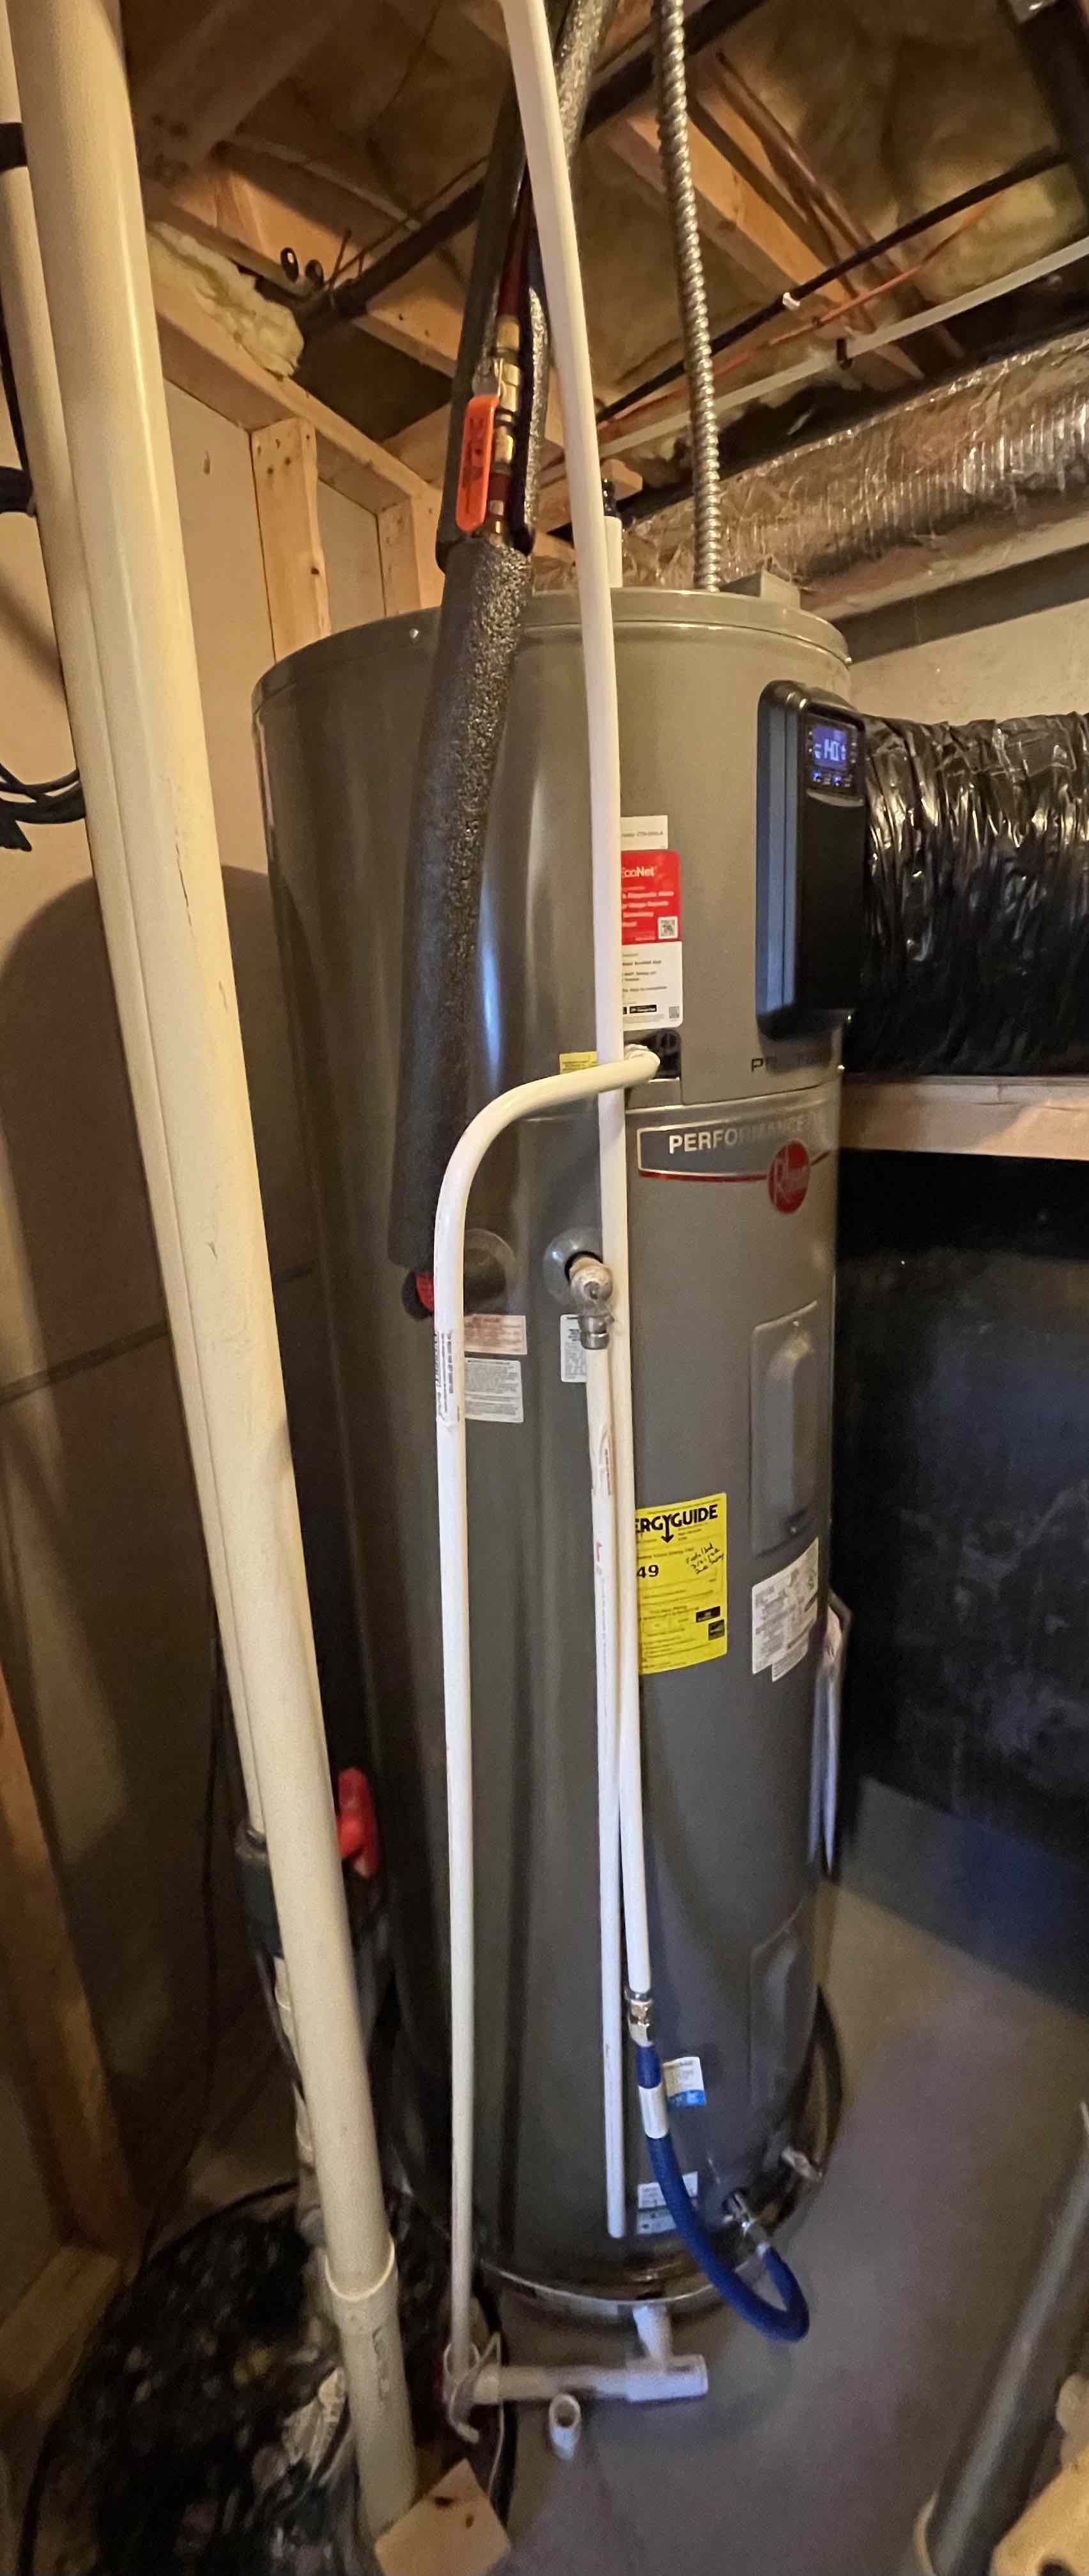 |
| Rheem hybrid 80 gallon water heater |
The water heater will take most of the day running the heat pump and ever so slowly getting the water up to temperature, and do so efficiently. As long as it doesn't have to turn on the resistive elements, it will provide hot water at maybe $1.60 a day. Compare this with the 1.6 gallons a day to run the oil boiler and the current $6.50/gallon or even $3/gallon. $1.60 < 4.80 < 10.40 or per year $580 < 1750 < 3800. If oil and electricity keep at their current price ratio, this water heater will pay for itself in just over a year.
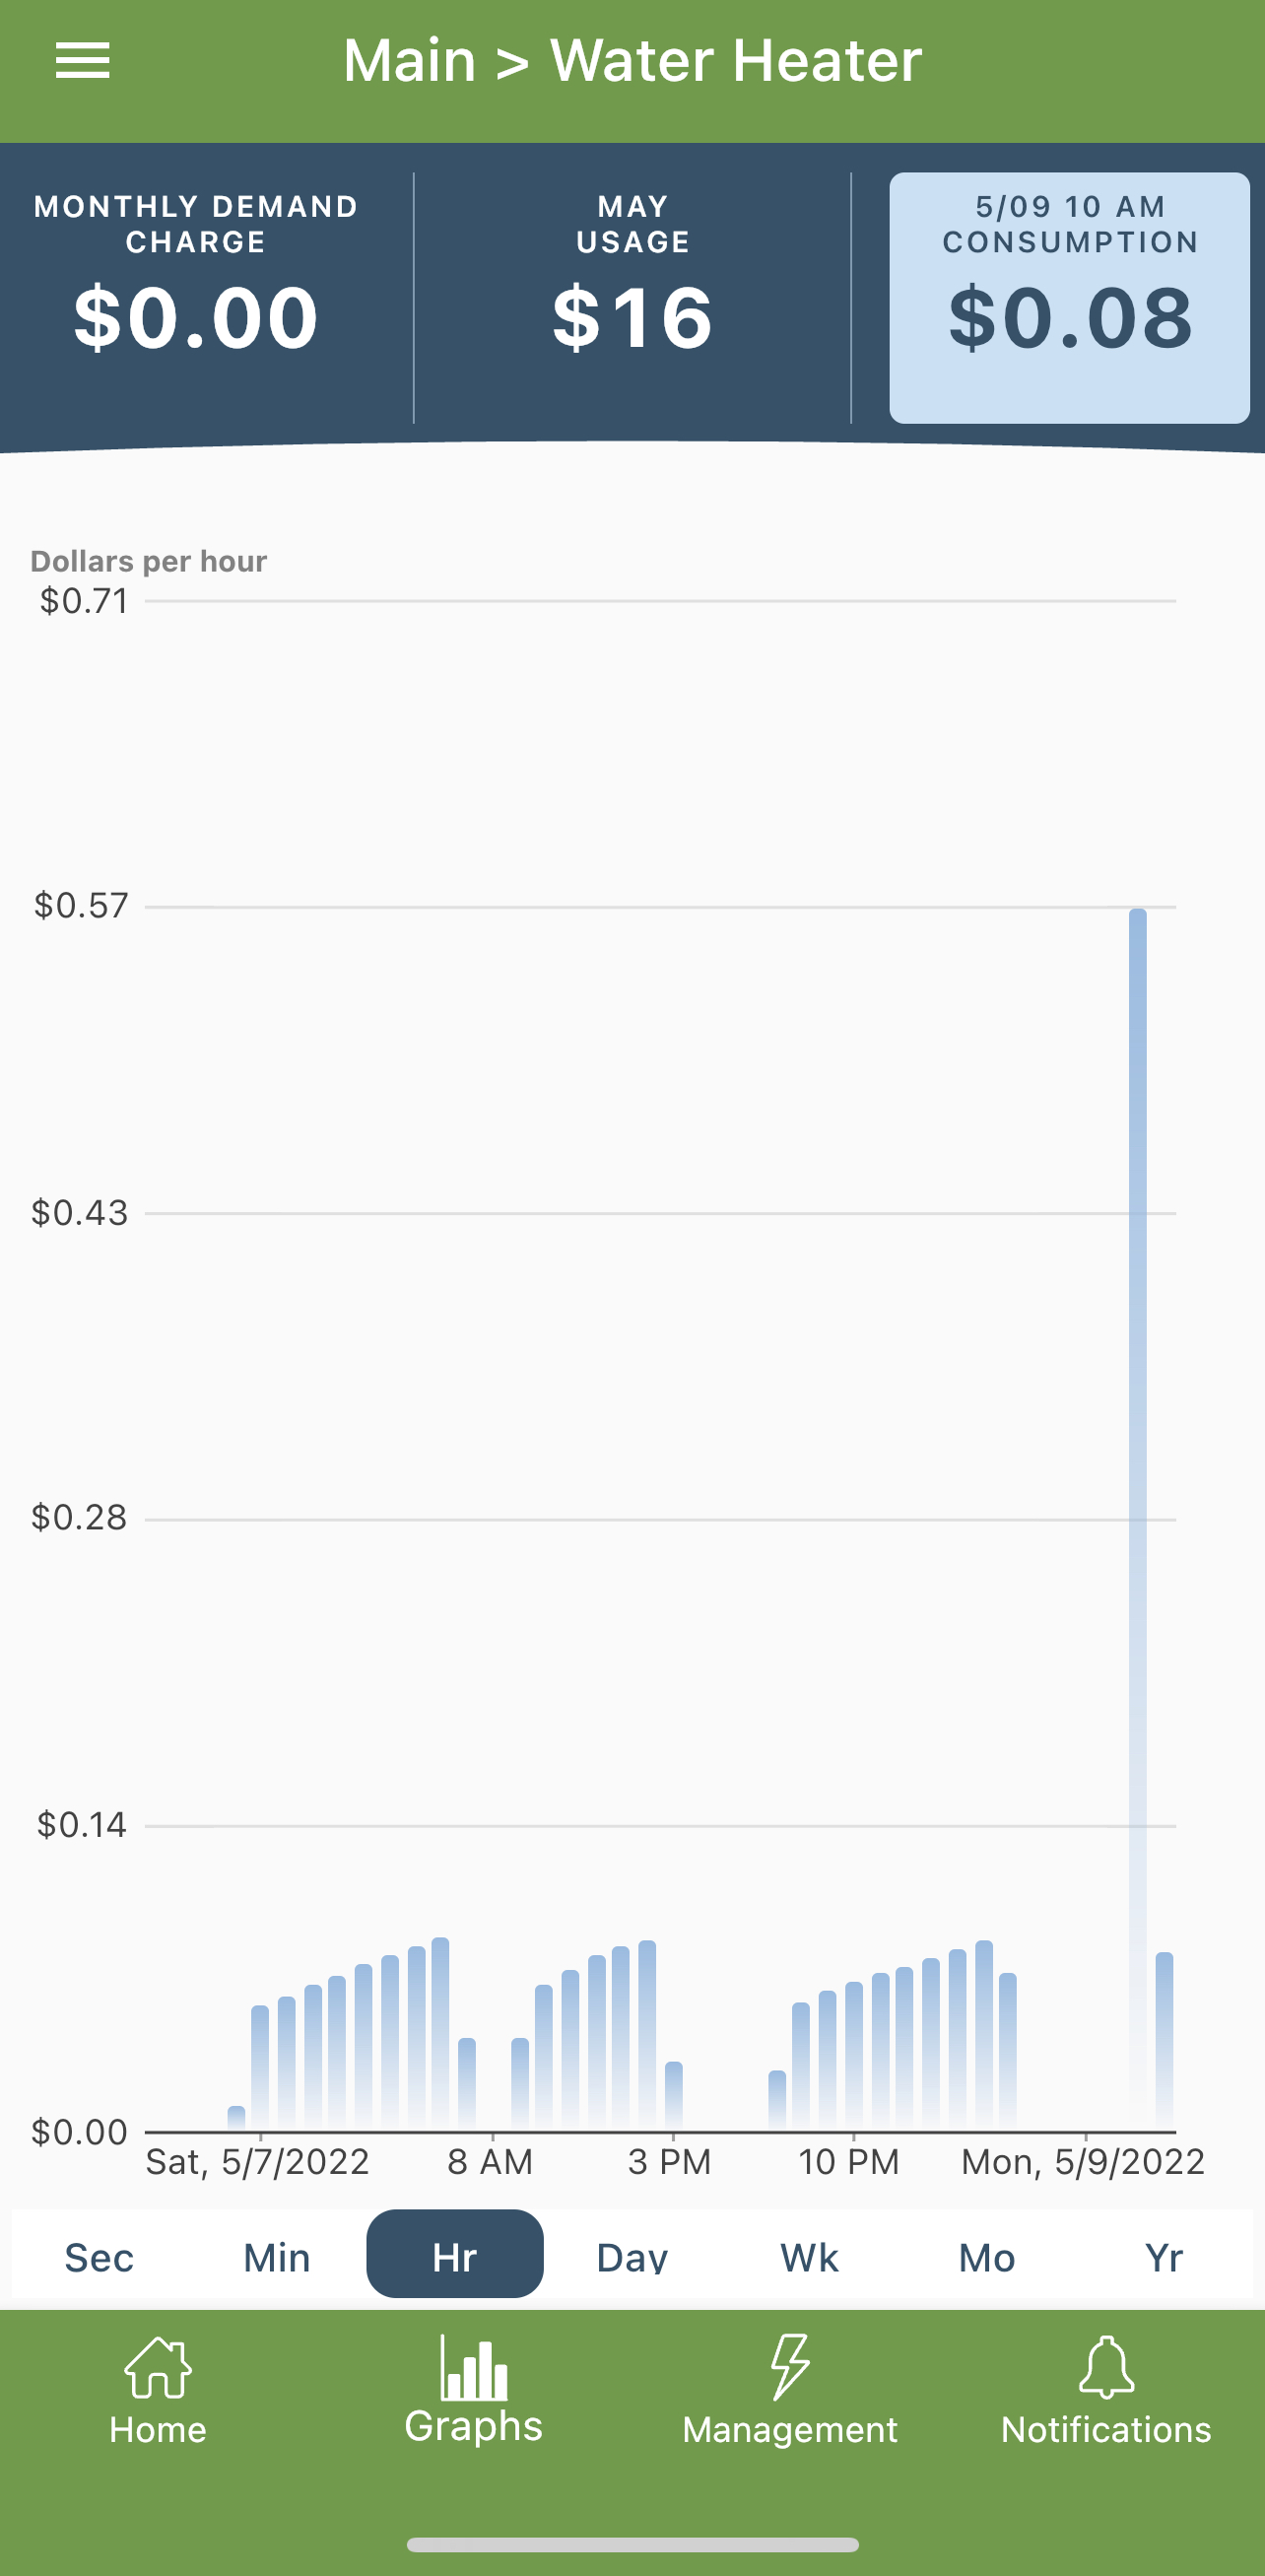 |
| Rheem Hybrid Money per Hour (Note surge when resistive element turned on.) |
The other thing is that it keeps the basement cold and dry. Which can be a good thing. With the boiler off in March, the basement was around 50°F—poor man's geothermal. The area around the water heater was maybe 45°. The ground has gotten warmer, and I've put up a temporary duct to spread the cold air, so now the whole basement is maybe 55°, not bad. When Summer visitors come, I'll either be thankful for free basement AC, or I'll put the water heater into expensive pure resistive mode. The house came with a "wine cellar"—I don't drink—with a now unused room chiller. I could see a future owner chilling the cellar with the water heater and saving money.
Oh, and it makes some noise which I can't hear upstairs, and can't be heard from the guest room if you close all the doors. Contrast with the boiler which made heat and noise all summer long and ruining the guest experience.
The Future
At this point we are approaching diminishing returns as there is not a lot of oil to save. However, the house would be more comfortable and useable in mid-Winter if I put in a couple more heat pumps. If I could get oil usage down to zero, I'd probably net out an additional yearly savings of $1000. So, I plan to expand my collection.
A single 12 kBTU floor mounted hyper heated unit for the sun room to keep it above freezing in the Winter and cool in the Summer. A dual system for our shared spaces and kitchen. And maybe replace the AC in the basement with a ducted heat pump for Winter time visitors and allowing me to use my workshop without gloves. The water heater is doing a very nice job of keeping it cold, so maybe not.
I will have to be careful regarding the system's maximum power requirements. I have a 200A panel, which most days is ample, but I can imagine some cold January night where the 4 heat pumps and a water heater all want to do their thing and pop.
Not to mention future electric cars.
And then there is solar. That would be quite the synergy once the electrification is complete. Lots of electricity savings that could justify a solar array.
The 4% Rule
I'm approaching retirement, and one of the rules of retirement is that your yearly expenses should be 1/25th (4%) of your investments if you never want to run out of money. People focus on the pile of money in the investments, but reducing expenses is nearly as important and often easier. Here, I've reduced my expenses by $2420, which means I'll need 25×$2420 = 60,500 fewer dollars saved for retirement, and it only cost me $12,200. Quite a bargain.